20+ Years Experience
Specialist Epoxy Flooring
Enquire Today For A Free No Obligation Quote
Surface preparation is an essential step when it comes to installing epoxy flooring. Properly preparing the surface ensures that the epoxy adheres correctly and provides a durable and long-lasting finish. In this article, we will explore the key aspects of surface preparation for epoxy flooring and why it is crucial for a successful installation.
Epoxy flooring is a type of flooring that consists of multiple layers of epoxy resin applied to a floor surface. It is known for its high durability, chemical resistance, and attractive appearance. However, achieving these benefits heavily relies on the quality of surface preparation.
Inadequate surface preparation can have severe consequences for epoxy flooring. It can lead to poor adhesion, resulting in peeling, blistering, or premature wearing of the epoxy. it can cause a range of issues such as bubbling, uneven texture, and a compromised finish. Therefore, it is vital to follow proper surface preparation steps to ensure a flawless epoxy flooring installation.
The steps for surface preparation typically include cleaning the surface, removing existing coatings or sealers, repairing damaged areas, etching or mechanical abrasion, filling cracks and pores, and priming the surface. Each of these steps is crucial to create a clean, smooth, and properly primed surface for epoxy application.
To carry out the surface preparation process, certain tools and materials are required. These may include a power washer for thorough cleaning, a grinder or shot blaster for removing existing coatings, an epoxy crack filler for repairing cracks, a patching compound for fixing damaged areas, and a primer for ensuring proper adhesion.
It is essential to keep in mind a few tips for successful surface preparation. These include thoroughly reading and following the manufacturer’s instructions, allowing sufficient drying time between each step, and employing the appropriate safety measures such as wearing protective gear.
By understanding the importance of surface preparation and following the correct procedures, you can ensure a smooth and durable epoxy flooring that enhances the aesthetics and functionality of your space.
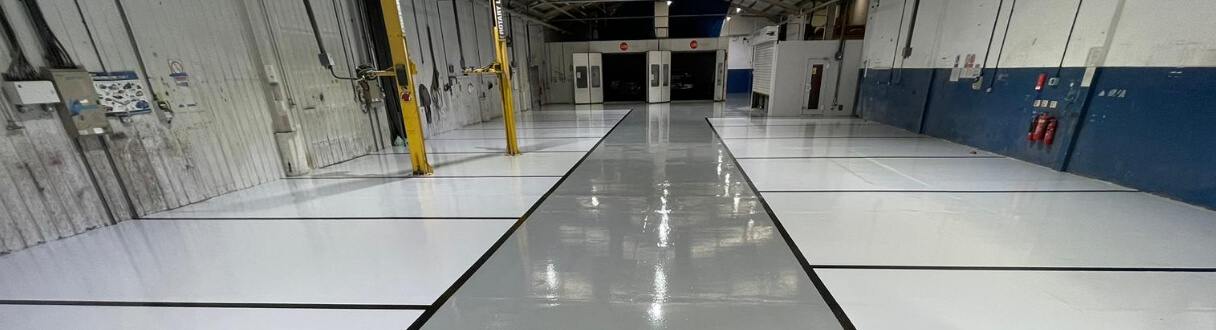
Epoxy flooring is a type of surface coating commonly used in industrial and commercial settings. It is a durable and long-lasting option that provides high levels of protection to the underlying concrete surface. Epoxy flooring is created by mixing epoxy resin with a hardener, which chemically reacts to form a strong and seamless surface. This type of flooring is known for its resistance to chemicals, stains, and abrasion, as well as its ease of cleaning and maintenance. Epoxy flooring is commonly found in warehouses, garages, hospitals, and workshops due to its durability and aesthetic appeal.
Proper surface preparation is essential for the successful installation of epoxy flooring due to several key factors.
1. Adhesion: Surface preparation ensures that the epoxy coating adheres securely to the underlying surface, preventing peeling or delamination.
2. Durability: A well-prepared surface allows for better penetration of the epoxy, resulting in a stronger bond and increased durability.
3. Smoothness: Surface imperfections such as cracks or unevenness can be addressed during preparation, creating a smoother finished floor.
4. Cleanliness: Thorough cleaning and removal of contaminants such as grease or oil prevent them from compromising the adhesion and performance of the epoxy.
5. Longevity: With proper surface preparation, epoxy flooring can withstand heavy traffic, chemical spills, and daily wear and tear for many years.
John, a small business owner, decided to install epoxy flooring in his workshop without proper surface preparation. Within a few months, the epoxy started peeling, causing inconvenience and costly repairs. Realising the importance of surface preparation, John sought professional help, and with the new properly prepared surface, his epoxy flooring lasted for years without any issues.
Inadequate surface preparation for epoxy flooring can lead to various consequences, which can compromise the longevity and performance of the flooring system.
To avoid these consequences, it is crucial to follow the proper surface preparation steps and ensure thorough cleaning, repairing damaged areas, and appropriate priming before applying the epoxy coating.
Proper surface preparation is essential for a smooth start to your epoxy flooring project. This section provides a step-by-step guide to achieving a flawless foundation. Each sub-section covers a crucial aspect of surface preparation, from cleaning the surface to priming it for optimal adhesion. Let’s dive into the details of prepping your floor for a perfect epoxy finish. Remember, these steps are vital for achieving long-lasting and beautiful results.
Cleaning the surface is a crucial step in surface preparation for epoxy flooring. To clean the surface, start by removing any debris or loose material using a broom or vacuum cleaner. Next, scrub the surface with a mild detergent or degreaser to remove dirt, oil, and grease. Rinse the surface thoroughly with clean water to remove any remaining residue. After that, dry the surface completely using a mop, squeegee, or air blower. Finally, inspect the surface for any stubborn stains or contaminants and treat them accordingly.
Fact: Properly cleaning the surface ensures proper adhesion and longevity of the epoxy coating.
Removing existing coatings or sealers is a crucial step in surface preparation for epoxy flooring. Here are the steps involved:
Fact: Removing existing coatings or sealers is essential as it allows the epoxy coating to adhere properly and provides a longer-lasting and more durable flooring solution.
When preparing the surface for epoxy flooring, it is important to repair any damaged areas. This step is crucial in order to achieve a smooth and even application of the epoxy coating, and to prevent any imperfections or weak spots. Here are the steps to follow when repairing damaged areas:
By following these steps, you will be able to effectively repair any damaged areas and prepare the surface for a successful epoxy flooring application.
Etching or mechanical abrasion is a crucial step in the surface preparation for epoxy flooring. It is necessary to create a rough and porous surface, which allows the epoxy to adhere effectively. This process involves using tools or materials to eliminate any existing coatings, smoothen the surface, and open up pores for better adhesion. Commonly used tools include grinders or shot blasters, which mechanically abrade the surface, and etching compounds that chemically create a porous surface. By utilizing etching or mechanical abrasion, the surface is properly prepared, guaranteeing secure adhesion of the epoxy flooring and resulting in a durable and long-lasting finish.
Filling cracks and pores is a crucial step in preparing the surface for epoxy flooring. This step is important to ensure a smooth and durable finish. Here are the steps for filling cracks and pores:
It is important to follow the product instructions and wear the appropriate protective gear when performing this task. Taking the time to properly fill cracks and pores will result in a flawless epoxy flooring finish.
To ensure proper adhesion and longevity for epoxy flooring, priming the surface is an essential step. Here are the steps involved in priming the surface:
Thoroughly clean the surface to remove any dirt, dust, or debris.
Repair any damaged areas, such as cracks or holes, using an epoxy crack filler.
Evaluate the surface and determine whether etching or mechanical abrasion is necessary for proper adhesion.
If necessary, use an acid-based etching solution or mechanically abrade the surface with a grinder or shot blaster.
Fill any remaining cracks or pores with a patching compound to create a smooth and level surface.
Apply a primer specifically designed for epoxy flooring to enhance adhesion and ensure a durable finish.
It is crucial to follow these steps to ensure a successful epoxy flooring installation. Remember to carefully follow the manufacturer’s instructions for each product used during the priming process. By properly priming the surface, you create a solid foundation for the epoxy coating, resulting in a long-lasting and visually appealing flooring solution.
Having the right tools and materials is crucial when it comes to preparing the surface for epoxy flooring. In this section, we’ll discuss what you need to gather before getting started. From power washers to grinders or shot blasters, epoxy crack fillers to patching compounds, and primers – we’ll cover it all. So, grab your gear and let’s make sure we have everything on hand for a successful surface preparation journey.
EnglishUK
Having the right tools and materials is crucial when it comes to preparing the surface for epoxy flooring. In this section, we’ll discuss what you need to gather before getting started. From power washers to grinders or shot blasters, epoxy crack fillers to patching compounds, and primers – we’ll cover it all. So, grab your gear and let’s make sure we have everything on hand for a successful surface preparation journey.
A power washer is a vital tool that contributes to the success of surface preparation for epoxy flooring installation.
A grinder or shot blaster is necessary for proper surface preparation when installing epoxy flooring. These tools assist in removing existing coatings or sealers, repairing damaged areas, and creating a clean and porous surface for the epoxy to adhere to. Here is a list of important points to consider when using a grinder or shot blaster:
By effectively using a grinder or shot blaster, you can achieve a properly prepared surface that will enhance the adhesion and longevity of your epoxy flooring.
Epoxy crack filler is a crucial part of the surface preparation process for epoxy flooring. Here are the necessary steps for using epoxy crack filler:
True story: John, a homeowner, had cracks in his garage floor that were causing water seepage. He used epoxy crack filler to repair the cracks and prevent further damage. The filler provided a durable and long-lasting solution, ensuring his garage floor was protected and maintained its aesthetic appeal.
Patching compound is a crucial material utilised in the surface preparation for epoxy flooring. It aids in repairing damaged areas and ensuring a smooth and level surface for the application of epoxy. Here are some important points to consider about patching compound:
Patching compound is a crucial material utilised in the surface preparation for epoxy flooring. It aids in repairing damaged areas and ensuring a smooth and level surface for the application of epoxy. Here are some important points to consider about patching compound:
A primer is a crucial part of the surface preparation process for epoxy flooring. It acts as a bonding agent between the surface and the epoxy coating, ensuring better adhesion and durability. The primer creates a uniform and stable surface, preventing issues such as bubbling, peeling, or delamination. To apply the primer, a roller or brush is commonly used. It is important to select the appropriate primer based on the substrate and the type of epoxy system being applied. The primer should be applied according to the manufacturer’s instructions, allowing sufficient drying time before applying the epoxy coating. Using a primer in surface preparation for epoxy flooring helps achieve a smooth and long-lasting finish.
Successful surface preparation is essential to achieve a durable and long-lasting epoxy flooring. To ensure a smooth and effective preparation process, follow these tips:
Thoroughly clean the surface by removing any dirt, oil, or grease using a degreaser.
Repair any cracks, holes, or damaged areas using a suitable patching compound.
Etch the surface with an acid-based solution to create a rough texture for better adhesion.
Eliminate any remaining dust and debris by vacuuming or sweeping the surface.
Apply a primer coat to enhance adhesion and prevent future issues.
Allow the primer to dry completely before proceeding with the epoxy application.
Follow the manufacturer’s instructions for mixing and applying the epoxy coating.
Apply multiple coats for a thicker and more durable finish.
Allow each coat to dry and cure according to the recommended time frame.
Inspect the surface for any imperfections and make necessary touch-ups.
By following these tips for successful surface preparation, you can ensure that your epoxy flooring will be resistant to wear, chemicals, and other potential damages.
Surface preparation is crucial for the success of an epoxy flooring project. It ensures proper adhesion, durability, and long-term success. Without adequate surface preparation, the epoxy coating may not bond properly to the substrate, leading to issues such as peeling or delamination.
There are several methods for surface preparation before epoxy flooring, including acid etching, diamond grinding, and shot blasting. Acid etching involves using an acidic solution to remove surface contaminants and create a porous surface for better adhesion. Diamond grinding uses rotating diamond grinders to remove irregularities and provide a smooth, flat surface. Shot blasting uses steel shot to blast the surface, removing unwanted compounds and creating a profile for epoxy bonding.
Cleaning and repairing the concrete before applying epoxy coating is essential because a clean and sound substrate is necessary for proper adhesion. It helps remove surface contaminants, such as oil spots and greasy residue, that can hinder bonding capabilities. Repairing cracks and damaged areas ensures a flat surface, preventing any issues in the future and promoting the longevity of the epoxy coating.
A field test for adhesion involves applying a small sample of epoxy coating to the concrete substrate and assessing its bonding capabilities. It is advisable to perform this test before the full installation to ensure that the epoxy coating will adhere properly and provide the desired results. By conducting a field test, any potential issues with adhesion can be identified and addressed before committing to the entire project.
Epoxy flooring is generally not applied to newly placed concrete until it has developed its full design strength, typically around 28 days. This waiting period allows the concrete to cure and become structurally sound. Applying epoxy coating too soon can result in adhesion failure or other problems because the concrete may still contain excessive moisture or be insufficiently cured.
Moisture, whether in vapor or liquid form, can adversely affect the adhesion of epoxy flooring. It can lead to adhesion failure, blistering, or other performance issues. It is crucial to eliminate any moisture-related problems by repairing water channels, ensuring a proper vapor barrier, and addressing any water damage before applying the epoxy coating.
We Aim To Reply To All Enquiries With-in 24-Hours