20+ Years Experience
Specialist Epoxy Flooring
Enquire Today For A Free No Obligation Quote
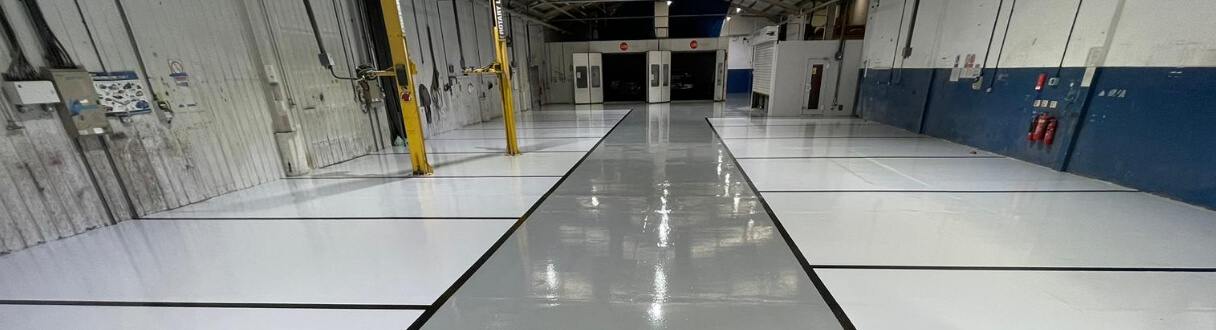
Epoxy flooring is a popular choice for both residential and commercial spaces due to its durability, versatility, and aesthetic appeal. It provides a seamless, glossy, and easy-to-maintain surface that can withstand heavy foot traffic, chemicals, and abrasion. This step-by-step guide aims to provide detailed application techniques for epoxy flooring, ensuring a successful project.
Before diving into the application process, it’s important to understand the benefits of epoxy flooring and how to choose the right epoxy for your specific project. Epoxy flooring offers advantages such as high durability, resistance to stains and chemicals, and the ability to customize the appearance with various colors and decorative elements. When choosing the right epoxy, consider factors such as the type of epoxy (solvent-based or water-based), the level of protection required, and the specific conditions of the space.
Proper surface preparation is crucial for a successful epoxy flooring application. This includes thorough cleaning of the floor to remove any dirt, debris, or contaminants, as well as repairing any cracks or imperfections in the surface. A clean and smooth surface will ensure proper adhesion and longevity of the epoxy coating.
The application process begins with applying the epoxy primer, which acts as a bonding agent between the substrate and the epoxy coating. This step involves mixing the primer according to the manufacturer’s instructions and applying it evenly to the prepared surface.
Once the primer has cured, the next step is to apply the epoxy coating. This involves mixing the epoxy resin and hardener according to the recommended ratios and applying it to the floor using a roller or squeegee. It’s important to work efficiently and systematically to ensure uniform coverage and a smooth finish.
For those looking to add a decorative touch to their epoxy flooring, optional steps include adding colored flakes or other decorative elements. This involves selecting the desired colored flakes, broadcasting them onto the wet epoxy surface, and sealing them with additional layers of epoxy.
To enhance the durability and longevity of the epoxy flooring, a topcoat is applied after the epoxy coating has fully cured. The topcoat provides additional protection against UV rays, chemicals, and abrasion. Similar to the previous steps, the topcoat requires proper mixing and application techniques.
Once the epoxy flooring has been applied, a curing and drying process is necessary. This typically involves allowing sufficient curing time for the epoxy to harden and ensuring proper ventilation to facilitate the drying process. Following the recommended curing and drying times will ensure optimal performance and longevity of the epoxy floor.
Finally, maintaining the epoxy floor requires regular cleaning and preventive measures to prevent damage. Establishing a routine cleaning regimen that includes sweeping, mopping, and occasional deep cleaning will help preserve the appearance and performance of the epoxy floor. taking precautions such as using mats or protective pads under heavy furniture and avoiding harsh chemicals will prevent scratches and damage to the surface.
By following these step-by-step application techniques and implementing proper maintenance practices, you can achieve a stunning and long-lasting epoxy flooring that enhances the functionality and aesthetics of your space.
Epoxy flooring provides numerous advantages for both residential and commercial spaces.
Pro-tip: For maximum benefits and longevity, it is recommended to have your epoxy flooring professionally installed by experienced contractors.
Looking to begin an epoxy flooring project? This section will discuss the important task of choosing the appropriate epoxy for your specific requirements. We will explore the various types of epoxy available and highlight key factors to consider when selecting the ideal product. Whether you want a resilient garage floor or a stunning showroom finish, this section has all the information you need. Let’s delve into the world of epoxy and find the perfect match for your project!
There are several different types of epoxy that can be used for various projects. The following table provides an overview of the common types of epoxy and their characteristics:
| Epoxy Type | Characteristics |
|---|---|
| Solvent-based epoxy | Provides high chemical resistance |
| Water-based epoxy | Environmentally friendly |
| 100% solid epoxy | Offers maximum durability |
| Self-leveling epoxy | Smooth and seamless finish |
When choosing the type of epoxy for your project, consider factors such as the required level of chemical resistance, environmental impact, desired durability, and the finish you want to achieve.
When choosing epoxy for your project, there are several important factors to consider.
By carefully considering these factors, you can choose the appropriate epoxy for your specific needs and ensure a successful flooring project.
Get ready to begin the epoxy flooring application process by preparing the surface. This section will cover two important sub-sections that are essential for achieving a flawless finish. First, we will address the crucial task of cleaning the floor to ensure that it is free from dirt, grime, and residue. Next, we will explore the process of repairing cracks and imperfections, which will create a smooth and durable foundation for your epoxy masterpiece. Let’s put on our gloves and start the transformation of the surface!
Cleaning the floor is a crucial step in preparing it for epoxy flooring. Here is a step-by-step guide to properly clean the floor:
To ensure a successful epoxy flooring application, it is important to have a clean and properly prepared surface. Following these cleaning steps will help remove any dirt, grease, or contaminants that can interfere with the adhesion of the epoxy coating. It is recommended to consult the specific instructions provided by the epoxy manufacturer for further guidance on cleaning and preparing the floor.
To repair cracks and imperfections in epoxy flooring, follow these steps:
Epoxy flooring has been used for decades to provide durable and seamless surfaces. It was first developed in the early 20th century for industrial purposes. Over time, advancements in technology and materials have made epoxy flooring more versatile and popular in various settings, including residential, commercial, and industrial spaces. Today, epoxy flooring is known for its durability, resistance to chemicals and stains, and ease of maintenance, making it a preferred choice for many property owners.
Applying the epoxy primer is an essential step in achieving a flawless epoxy flooring finish. This section will provide detailed instructions on how to mix the primer and apply it seamlessly onto the surface. By using expert techniques and insider tips, we will help you ensure that the epoxy primer is applied evenly and maximises adhesion. Prepare yourself to unlock the potential of your epoxy flooring project with our step-by-step guide to mastering this crucial phase.
Mixing the primer for epoxy flooring is an essential step in ensuring a successful application. To properly mix the primer, follow these steps:
Remember to carefully follow the manufacturer’s instructions for mixing the primer and always prioritize safety by wearing protective gear. Accurate mixing of the primer will help you achieve optimal results for your epoxy flooring project.
When applying the primer for epoxy flooring, it is important to follow these steps for optimal results:
Applying the Epoxy Coating
When applying an epoxy coating for your flooring, it is important to get the right mix and execute a flawless application. This section will discuss the process in detail, beginning with the proper mixing of epoxy resin and hardener. We will then explore the application of the epoxy coat, guaranteeing a smooth and durable finish. Prepare yourself to learn the techniques that will turn your floors into beautiful masterpieces.
Mixing the epoxy resin and hardener is a crucial step in the application process of epoxy flooring. Follow these steps for a successful mix:
Pour the resin: Pour the measured amount of epoxy resin into a clean mixing container.
Add the hardener: Carefully pour the measured amount of hardener into the resin.
Mix thoroughly: Use a mixing stick or paddle to blend the resin and hardener together. Stir continuously for the recommended mixing time to ensure a homogeneous mixture.
Scrape the sides: While mixing, scrape the sides and bottom of the container to incorporate any unmixed resin or hardener.
Check for consistency: The mixed resin and hardener should have a consistent colour and texture. Make sure there are no streaks or clumps.
Pro-tip: Avoid mixing too quickly or vigorously, as it may introduce air bubbles into the mixture. Take your time to achieve a smooth and bubble-free mixture for a professional finish.
Applying the Epoxy Coat necessitates careful preparation and precise execution. To ensure a successful application, follow these steps:
Looking to enhance your epoxy flooring project? Look no further! This section delves into the possibility of incorporating coloured flakes or decorative elements into your flooring. Uncover the tips for selecting the ideal coloured flakes that will beautifully complement your space, and master the art of expertly applying them for a breathtaking outcome. Prepare to revolutionise your floor into a captivating masterpiece that will impress all. Allow your imagination to run wild and let your creativity soar!
Choosing the coloured flakes for your epoxy floor involves considering the overall aesthetic and desired effect. Here are some factors to consider:
To apply coloured flakes to your epoxy floor, follow these steps:
Applying the Topcoat Now that the surface has been prepared and the epoxy flooring has been primed, it is time to move on to the most crucial step: applying the topcoat. This step consists of two important sub-sections. Firstly, we will discuss the process of mixing the topcoat, ensuring that the consistency is perfect for achieving a flawless finish. Then, we will proceed to the actual application, where we will explore various techniques and tips to help you achieve a smooth and long-lasting result. So, grab your tools and let us prepare to transform your space with a stunning epoxy floor!
Mixing the topcoat is an essential step in the process of applying epoxy flooring. Here is a step-by-step guide to mixing the topcoat:
By following these steps, you can ensure that the topcoat is properly mixed and ready for application on your epoxy flooring.
Applying the topcoat is an essential step in the epoxy flooring process, as it ensures durability and creates a smooth, glossy finish. Here is a step-by-step guide:
1. Mixing the topcoat: Follow the manufacturer’s instructions and thoroughly mix the topcoat resin and hardener.
2. Applying the topcoat: Use a roller or brush to apply the topcoat in even, overlapping strokes, working in small sections.
Now, let me share a true story. John, a homeowner, applied the topcoat to his garage floor using an epoxy flooring kit. The result was stunning – a sleek, professional-looking floor that also withstood heavy use. John’s friends were so impressed that they decided to do the same in their own garages.
The curing and drying process of epoxy flooring involves two important factors: allowing enough time for curing and ensuring proper ventilation. By giving the epoxy sufficient time to cure and implementing proper ventilation, you can achieve a flawless and durable finish for your flooring project. In this section, we will explore the significance of each sub-section and discuss the best practices for a successful curing and drying process for your epoxy flooring. Let’s begin and discover the secrets to creating a long-lasting and beautiful epoxy floor!
When applying epoxy flooring, it is essential to allow sufficient curing time. This is important as it ensures a durable and long-lasting finish. Follow these steps:
Ensuring proper ventilation is essential when applying epoxy flooring. It is important to have adequate ventilation to release harmful fumes and maintain a safe working environment. To ensure proper ventilation during the application process, follow these steps:
1. Assess the workspace: Check that the area where you are applying the epoxy flooring has sufficient ventilation, such as windows or fans.
2. Take protective measures: Wear a respirator or mask to protect yourself from inhaling any fumes. Also, wear gloves and goggles for additional protection.
3. Promote airflow: Open windows or doors to allow fresh air to circulate in the space. You can also use fans or industrial blowers to improve air circulation.
4. Maintain proper airflow: Keep ventilation systems running during and after the epoxy application to remove fumes and ensure proper ventilation.
By following these steps, you can create a safe and well-ventilated environment while applying epoxy flooring.
To maintain the durability and aesthetics of your epoxy floors, it is important to keep them clean and well-maintained. This section will discuss effective techniques for cleaning and maintaining epoxy floors, ensuring they remain in pristine condition. You will discover the secrets of a regular cleaning routine and learn how to prevent any damage to your floors. By following these tips, you can enjoy the longevity and beauty of your epoxy floors for years to come. Let’s delve into the world of epoxy floor care and maintenance!
To maintain the longevity and appearance of your epoxy floors, it is important to establish a regular cleaning routine. Follow these steps for regular cleaning:
1. Remove loose dirt and debris by sweeping or vacuuming the floors.
2. Clean the surface using a mop or soft-bristle brush and a mild detergent or epoxy floor cleaner.
3. Avoid using abrasive cleaners or scrub brushes as they may damage the epoxy coating.
4. Rinse the floor thoroughly with clean water to remove any cleaning residue.
5. Dry the floor completely using a microfiber cloth or air blower.
By following a regular cleaning routine, you can ensure that your epoxy floors remain in excellent condition and extend their lifespan.
To prevent damage to epoxy floors, take the following steps:
Yes, epoxy floor paint can be applied by homeowners as a DIY project. However, it is important to properly prepare the surface and follow the step-by-step guide for best results.
For a roller applied floor, it is recommended to apply one coat of primer and two coats of epoxy floor coating. This will ensure a durable and long-lasting finish.
To fill cracks in the concrete, you can use a concrete filler or epoxy filler specifically designed for this purpose. It is important to follow the manufacturer’s instructions for proper application.
For heavier industrial use, such as manufacturing or food processing, a self-leveling floor with a larger thickness may be more appropriate. This type of epoxy flooring can withstand more extreme conditions and provide better durability.
The most important step in applying epoxy floor paint is surface preparation. This typically involves cleaning the floor thoroughly, removing any existing coatings or sealants, and diamond grinding or creating a slightly rough profile for proper mechanical bonding.
While epoxy flooring offers many benefits, there are some potential drawbacks to consider. It requires extensive surface cleaning and preparation, multiple applications with curing times, and concrete surfaces should be completely dry and at the appropriate temperature for optimal curing.
We Aim To Reply To All Enquiries With-in 24-Hours